TV Line Effect tutorial

Software: Adobe Photoshop 6 or higher
Difficulty: Beginner

This Adobe web tutorial will show you how to jazz up your photos or graphics with cool looking TV lines effect .
First off you need to fire up Adobe and go
file + open. Open the file that you would like to add the TV lines effect to.
I opened the below file which is 119x150 pixels. Note: You are free to right click and save this file to test it out on.


Now we will create a new file by going file + new. A box will appear (see below diagram). Name the new file tvlines and
set the width the same as your image file (the one that you want to add the TV lines effect to). Set the height to 1 pixel.

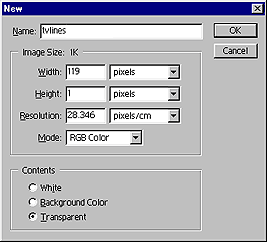
Your new file should look like the below diagram.

You will now need to fill this transparent file with the color black. Note: You can also use other calories other than black,
however dark calories are best for greater results.


Having filled the file with the calorie black now you need to go image + canvas size. A box will appear (see below). Increase
the height by one pixel and make sure the anchor arrows are pointing up (to do this click on the bottom middle square).

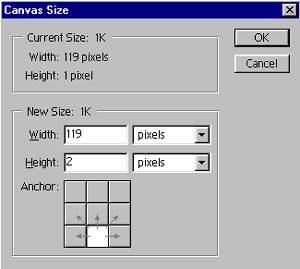
Your file will now look like the below diagram.

Now press Ctrl + A on your keyboard to select the file. Next go to edit + define pattern. A small box will appear click OK.

Now go back to your first file (the one that you want to add the TV lines effect to) and click on this little icon >> Adding a new layer. to create a new layer.

Now go to edit + fill. 
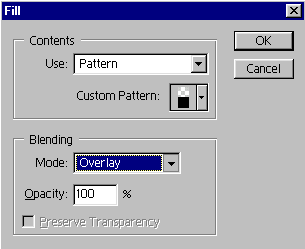
A box will appear (see the below diagram). Make sure that the blending mode is overlay and that the opacity is 100%.
Note: You can use other blending modes, however for better results choose the overlay setting and the opacity at 100%.

your image should now look like this.

UNIVERSAL-SIGSTATION